woah i got this cool thing, what is it?
You've just opened your box from Spark and gotten your new device.
This means you're holding your new Spark device, whether it be a Core or Photon.
What's on it?
The Microcontroller. The microcontroller is the brain of your chip. It runs your software and tells the rest of the device what to do. Unlike your computer, it can only run one application (often called firmware or an embedded application), which can be simple, just a few lines of code, or very complex, depending on what you want to do. The microcontroller interacts with the outside world using pins.
The Pins. Pins are the input and output parts of the microcontroller that are exposed on the sides of your device. GPIO pins can be hooked to sensors or buttons to listen to the world, or they can be hooked to lights and motors to act upon the world. There are also pins to allow you to power your device, or power motors and outputs outside of your device. There are pins for Serial/UART communication, and a pin for resetting your device. Read about your pins here and here.
The Wifi Module. This is probably why you bought your device-- the wifi module allows your Core or Photon to communicate with the internet. It connects your device to the internet in the same way that your smartphone might connect to a wifi network.
Buttons and LEDs. Your device tells you what is going on using its RGB LED. You can give it some instructions (factory reset, erase wifi networks, etc) using the RST and MODE buttons. There's also a nice blue LED on your device that you can control with the D7 pin.
For more technical details on what comes on your device, go here.
Okay great, I want to play with it I want to make it do a thing right now!
Good, me too! Let's get started.
Blueprint 001: Getting Started
This Blueprint is a Spark "Hello World." Use it to connect your device to the internet for the very first time, and blink the D7 LED on your device by using your smartphone.
Materials
- Hardware
- Your Spark device, brand new and out of the box!
- USB to micro USB cable (included with Photon Kit, Maker Kit, and Core)
- Power source for USB cable (such as your computer, USB battery, or a power brick)
- Software
- Spark Core Mobile App
- Experience
- None! This is your first Blueprint.
Step 1: Power On Your Device
Plug the USB cable into your power source. (Your computer works perfectly for this purpose.)

I've got the powerrrrrr!!!
Although you may be plugging it into your computer, your device doesn't need the computer to learn to connect to the internet. Right now, it's just using it for power. You could just as easily power your device with a power brick, a battery shield, or another power source wired to the VIN pin.
As soon as it is plugged in, the RGB LED on your device should begin blinking blue.
If your device is not blinking blue, hold down the "MODE" button for three seconds to reset.
If your device is not blinking at all, or if the LED is burning a dull orange color, it may not be getting enough power. Try changing your power source or USB cable.
Step 2: Connect With Your Smartphone
What happens when my device wants to talk to the internet?
When your device comes to life for the first time, it has a specific set of objectives:
- Find wifi
- Connect to wifi
- Execute firmware
Unless you tell it not to, your device will run through these commands every time you power it on. You can teach it different wifi networks using your phone or computer. It remembers up to 7 wifi networks, and it will connect to these automatically if it can find them.
When you power on your device for the very first time, though, it doesn't know any networks. It blinks blue, which is its way of saying, "Hey, I'm ready to find some wifi." Let's help it out.
Open the Spark Core app on your phone. Log in or sign up for an account with Spark if you don't have one.

Make sure your phone is connected to the WiFi you want to teach to your device (it'll show up in the SSID blank on the app). Enter your password and click CONNECT!
This may take a little while- but don't worry. It should go through the following colors:
- Blinking blue: Listening for Wi-Fi credentials
- Solid blue: Getting Wi-Fi info from app
- Blinking green: Connecting to the Wi-Fi network
- Blinking cyan: Connecting to the Spark Cloud
- Blinking magenta: Updating to the newest firmware
- Breathing cyan: Connected!
If you are having trouble connecting, that's okay! Go to this page to troubleshoot your connection. If you can't connect at all, that's okay too. Read over this example quickly, and then check out the next lesson to connect your device using the USB cable.
Once you have connected your device, it has learned that network. Your device can store up to seven networks. If you feel like your device has too many networks on it, you can wipe your device's memory of any wifi networks it has learned. You can do so by continuing to hold the MODE button for 10 seconds until the RGB LED flashes blue quickly, signaling that all profiles have been deleted. The RGB LED should now be flashing blue again.
Step 3: Blink an LED!
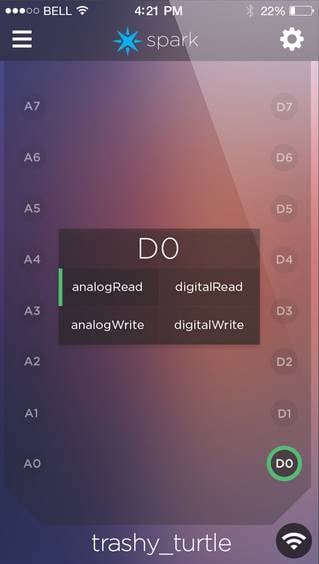
The Spark app should now be on the Tinker screen, as shown below.
What is Tinker?
We've taken the liberty of loading some firmware onto your device for you. It's called Tinker, and it helps you talk to your device by sending power to the pins and reading power levels from the pins. Tinker's functions include:
digitalReadreads the input of a digital pin, such as one connected to a button or motion sensor. The input will be either HIGH (powered at 3.3 V) or LOW (not powered).digitalWritesends digital output to a digital pin, such as one connected to a signal light. You can set this output to HIGH (powered at 3.3 V) or LOW (not powered).analogReadreads the input of an analog pin, such as one connected to a temperature sensor. The input will be between 0 and 255.analogWritewrites analog output to an analog pin, such as a dimmable LED. You can set this output from 0 to 255.We'll go over this more later, so don't worry. For more documentation on Tinker, click here.
As you can see on your smartphone, the circles represent different pins on your device. If you tap on these circles, you can see the Tinker functions available for the associated pins.
We could use tinker and the smartphone app to talk to any pin on your device. If you had a motor, an LED, a sensor, etc., you could interact with it using Tinker on your phone. But since I know you're very eager to get started, let's use an LED already provided on your device.
The D7 pin comes already wired to a small blue LED on the face of your device. When you set the power of the D7 pin to high, this LED turns on. Let's do that now.
Tap D7 then digitalWrite in the popup. Now when you tap the D7 circle the tiny blue LED should turn off or on!
Congratulations, you just blinked an LED over the internet, using your Spark device!
Keep in mind that with tinker, you can communicate with any of the pins, not just with the D7 LED. You can wire things to the pins to run motors, read sensors, and much more. The real fun part comes when you write your own firmware, of course. We'll go over that in later sections.