Hello, Internet!
Spark, meet the Internet. The Internet, meet Spark.
Spark-powered devices communicate with the Internet using SparkOS. If you've been following this tutorial, you've already been using SparkOS, but this chapter will give you a little more information on how it works.
What is Spark OS?
Spark OS is our distributed operating system for the Internet of Things. It is made up of three parts:
- Your Device. Your Core or Photon contains a firmware library that connects it to the Internet. The firmware helps it communicate with...
- The Spark Cloud. The Cloud, hosted on powerful servers, delivers messages to and from your devices. We access the Cloud using the REST API. (More on this in a moment.)
- Spark Interfaces. We can talk to the Spark Cloud using interfaces such as the Spark Mobile App (which you used to blink the D7 LED in Lesson 2) or SparkJS (our Javascript wrapper).
How do they work together?
Let's start by talking about the REST API.
REST means a lot of things, but for our purposes, it is an interface for you to easily find and interact with your device from the web.
Every Spark device has its own URL that can be used to GET variables, POST a new function call, or PUT new firmware. This URL lives on the Spark Cloud. You can write firmware for your device that can be accessed through the API.
What information is needed when I contact the REST API?
There are 3 pieces of information that you need to deliver to the REST API in order to contact your device:
- Who are you? We want to make sure that you and only you have access to your device. Listing your access token identifies you.
- What device do you wish to contact? You may have several devices running at the same time. Using the device ID allows you to pick the one you want to talk to.
- What would you like to do? We can define a function or variable in the device's firmware that can be identified in a
GETorPOSTrequest.For example, we could hook up our core to a thermometer and define a variable for temperature in our firmware. Then we could
GETinformation on temperature by asking the API:
GET /v1/devices/0123456789abcdef01234567/temperatureWhere
0123456789abcdef01234567represents your device ID andtemperaturerepresents your temperature variable as defined in your firmware.
But how do we send a GET, POST, or PUT request? What do we use to send it, and what happens when we do?
This is where the Spark Interfaces come in. You have been talking to your device so far using the Spark Mobile App, which sends a POST request to your device to blink the D7 LED. You could also use SparkJS to do this-- more on this later. For me, though, the clearest example came with HTML forms.
The first time I learned about POST requests was with simple HTML forms when I was a kid-- fill out a form, and POST it to the pertinent page to submit the results. Since the principles of the POST request are the same, you can send a request to the REST API in the same way.
Check out the Blueprint below.
Blueprint 003: Blinking from an HTML page
In this Blueprint, you will use URLs to blink the D7 LED on your device. (Technically, we are always using URLs to blink the D7 LED, but in this case we'll be playing with them through the browser.)
Materials
- Hardware
- Core or Photon
- USB to micro USB cable
- Computer
- Software
- spark.io/build or Spark Dev
- a text editor
- a browser
- Knowledge
- Blueprint 001: Getting Started
- Blueprint 002: Connecting with the Spark CLI
Step One: Set Up Your Device
Get connected to wifi using either your smartphone or the CLI, as detailed in Blueprint 001 and Blueprint 002. We won't go over this again here-- if you need a refresher, head on back to those recipes in lesson one and lesson two respectively.
Step Two: Who Are You?
The REST API identifies us by our Access Token. You can find your Access Token by clicking on the Settings icon in the development environment.
- The Settings Icon looks like this:

This will open a tray that contains your Access Token. Copy it and keep it somewhere safe!
What is the purpose of a Spark Access Token?
An access token grants permissions for controlling and communciating with your Spark device. The tokens are managed with a standard authentication / token system called OAuth.
Step Three: Which Device?
Now we will need to know what device to contact. Go to the "Cores" icon in the development environment to get your Device ID.
- The Cores icon looks like this:

You'll see a display like the following:
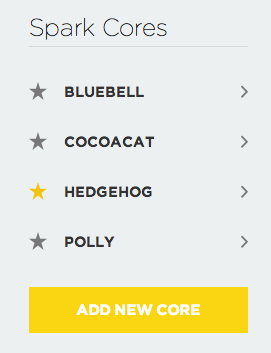
If you only have one device registered to your account, that device will be the only one listed.
Click on the star to select which device you want to send your firmware to.
Then, click on the small arrow next to your selected device's name. This will expand the tray and give you your Device ID. Copy this and keep it somewhere safe for now.
Step Four: What to Do?
Now let's tell our device what to do by putting firmware on it. We will make a function called blink that we can call using a POST request.
Make a new app. Give it whatever name you want-- I called mine "postBlink_1". Copy and paste the code below into the window:
int led=D7;

void setup() {
  pinMode(led, OUTPUT); // set the D7 LED as output
  Spark.function("blink",blinkfunc);    // a POST request for "blink" will reference blinkfunc, defined below
}

// call the below function when the POST request matches it
int blinkfunc(String command) {
    digitalWrite(led, HIGH);    // turn it on
    delay(1000);    // wait 1 second
    digitalWrite(led, LOW); // turn it off
    delay(1000);    // wait another second
    return 1;   // return 1 to show that this worked.
}

void loop() {
//not doing anything here
}
Click the  button to Save.
Click the  button to Verify your code.
Now, finally, click the  button to Flash the firmware to your device.
- This will flash the code to the device you selected in Step Three.
Step Five: Blink That LED!
Now that we have defined our function, we should be able to reference it in a POST request to our device.
We do that by contacting the URL that already exists for our device. It involes our Access Token and our Device ID. We are going to have it execute a function we wrote into the firmware in Step Four.
The format of your URL will be:
https://api.spark.io/v1/devices/YOUR DEVICE ID HERE/YOUR FUNCTION HERE?access_token=YOUR ACCESS TOKEN HERE
An example URL might be:
https://api.spark.io/v1/devices/0123456789abcdef01234567/blink?access_token=1234123412341234123412341234123412341234
Fill in the info you took down on your Device ID and Access Token from Steps Two and Three. Go to that URL in your browser, and you'll see that your core will blink, just like we instructed it to in the blink function we wrote in Step Four.
I see Curl a lot in the documentation. What is that?
Curl is a terminal command that allows you to transfer data to and from a server. If you use a Mac with OS X or any standard Linux build, you already have curl installed and can work with it immediately through the terminal. It is just one way to contact the REST API, and it gives you some versatility in terms of passing variables.
If you don't have curl, that's okay! If you understand
POSTrequests, you can use a different method to work this out.If you want to use curl in this example, go to the command line and type this:
curl https://api.spark.io/v1/devices/0123456789abcdef01234567/blink -d access_token=1234123412341234123412341234123412341234Typing
-din curl defines a POST request and allows you to put some data in there. In this case, the data we need to pass is our access token.Now execute that command. It should blink, just like in the example above!
Ready for the next step? We're going to add an argument.
Step Six: Add An Argument
We can make our firmware more complex by using arguments. Make a new app in your development environment. I named mine "postBlink_2". Copy and paste the code below into your window, save it, and flash it to your device.
int led=D7;

void setup() {
  pinMode(led, OUTPUT); // set the D7 LED as output
  Spark.function("blink",blinkfunc);    // a POST request for "blink" will reference blinkfunc, defined below
}

// call the below function when the POST request matches it
int blinkfunc(String command) {
    if (command == "hi") {
        digitalWrite(led, HIGH);    // turn it on
        delay(1000);    // wait 1 second
        digitalWrite(led, LOW); // turn it off
        delay(1000);    // wait another second
        return 1;   // return 1 to show that this worked.
    }
    else if (command == "sos") {
        digitalWrite(led, HIGH);    // blink SOS
        delay(500);
        digitalWrite(led, LOW);
        delay(500);
        digitalWrite(led, HIGH);
        delay(500);
        digitalWrite(led, LOW);
        delay(500);
        digitalWrite(led, HIGH);
        delay(500);
        digitalWrite(led, LOW);
        delay(500);
        digitalWrite(led, HIGH);
        delay(1000);
        digitalWrite(led, LOW);
        delay(500);
        digitalWrite(led, HIGH);
        delay(1000);
        digitalWrite(led, LOW);
        delay(500);
        digitalWrite(led, HIGH);
        delay(1000);
        digitalWrite(led, LOW);
        delay(500);
        digitalWrite(led, HIGH);
        delay(500);
        digitalWrite(led, LOW);
        delay(500);
        digitalWrite(led, HIGH);
        delay(500);
        digitalWrite(led, LOW);
        delay(500);
        digitalWrite(led, HIGH);
        delay(500);
        digitalWrite(led, LOW);
        delay(500);
        return 1;   // return 1 to show that this worked.
    }
    else {
        return -1; // return -1 to show that it did not work.
    }
}

void loop() {
//not doing anything here
}
There is now one function on your device: blink. This function takes either the argument hi or the argument sos. Passing the argument hi will cause the D7 LED to blink once. Passing the argument sos will blink the D7 LED in a morse code S-O-S pattern.
Step Six: Blink With An Argument
Now we can tell our core to blink just once, or blink in an SOS morse code pattern, depending on what we want.
We use POST requests when we submit HTML and PHP forms. Sending a POST request to the REST API works on the same principle. In fact, let's put together a little form in HTML to prove this fact.
Create a new text file in your text editor. Copy and paste this code into the editor. Edit it to include your actual Device ID and Access Token. Let's make a very simple HTML page to link up to that:
<form action="https://api.spark.io/v1/devices/53ff68066667574824422467/blink?access_token=db7a2ffc9953e8e4dbbe0d66fee286a0b7979b51" method="POST">
Blink me a message!<br>
<input type="radio" name="args" value="hi">Just say hello. (Blink once.)
<br>
<input type="radio" name="args" value="sos">It's an emergency! (Blink SOS.)
<br>
<input type="submit" value="Submit">
</form>
Save this as a .html file. I called mine "hellointernet.html"
Now open it up!
You'll see the form below, which will let you send the command "once" or "twice" to your Core, letting it blink once or twice as you may desire.
If you want to use curl for this, you can do it with the following commands, which use
-d args=to define arguments.
- Blink once:
curl https://api.spark.io/v1/devices/0123456789abcdef01234567/blink -d access_token=1234123412341234123412341234123412341234 -d "args=hi"
- Blink SOS:
curl https://api.spark.io/v1/devices/0123456789abcdef01234567/blink -d access_token=1234123412341234123412341234123412341234 -d "args=sos"
Connecting Your Device to Other Applications
This kind of command is actually pretty powerful. We can send commands to our core when something happens on our computer, through a local script. We can send commands when something happens on the internet. We can set up a server on Heroku or a similar service, and send a request to our Core when certain kinds of data come in.
In one extremely simple example, let's say that I want someone to be able to notify me by blinking the core on my desk when they need something.
If they are just saying hi, the core should blink once. If there is a big emergency, the core should blink S-O-S.
Load this firmware onto your core:
Of course, that's just proof-of-concept. You can make it much prettier and much more interesting using javascript and a heroku server. Go crazy.